Posts

TO TURN ON THE LED USING LPC2148

Image
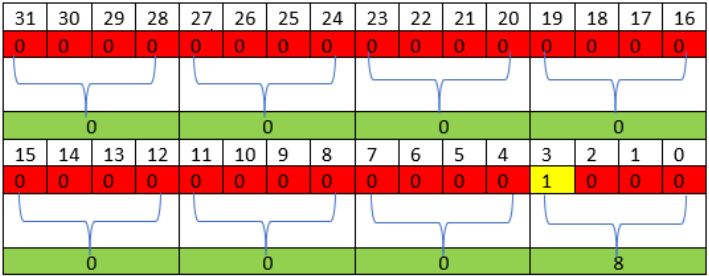
SIMULATOR: PROTEUS 8.0 SOFTWARE: KEIL  CIRCUIT DIAGRAM: WORKING: This project is about turning on the led connected to P0.0 pin of lpc 2148.In this project,LED is connected in current sinking arrangement. Whenever logic 0 is provided to P0.0 pin of lpc 2148, LED get turned ON.As in this project current sinking arrangement is used hence logic 0 is provided to turn on the led. PROGRAM: #include<LPC214x.h>      // Header file of LPC2148 int main() IODIR0=0x00000001;// select p0.1 as an output pin PINSEL0=0x00000000; // select gpio function of p0.1 while(1)   // continuous loop { IOCLR0 = 0x00000001;//turn on the led } } PROGRAM DESCRIPTION: Here,using IODIR register p0.0 pin is set as an output pin.PINSEL0 register is used to select the GPIO(General purpose input/output pin) function of the pin. Using IOCLR register logic 0 is provided to port 0.0 pin. While loop is used for the continuous process. VIDEO:     Note: Please refer below article to know more about

Introduction of IODIR,PINSEL,IOSET and IOCLR Registers

Image
How to select the direction of the port? IODIR is the command used to set the direction of the port as an input or an output. For setting the pin as an input pin we need to provide logic 0 and for setting the pin as an output pin we need to provide logic 1 to the respective pin. By default, on reset, all the pins are acting as an input so there is no need to set the pin as an input pin if we are resetting the arm7. But for setting the pin as an output pin we need to provide logic 0. Let's take the below example:   Supposed I want to set pin 3 of port 0 as an output then I will provide logic 1 to pin 3 of port 0. IODIR0: IODIR0 = 0x00000008 Supposed I want to set pin 16, pin 15, pin 2 and pin 1 of port 1 as an output then I will change the bits as follows: IODIR0 = 0x00018006; How to select the pin for a particular function? In arm7 each pin has multiple functions, to select the particular function of the respective pin  PINSEL  register is used. To select the particular function in

PIANO USING AT89C51RD2

Image
SIMULATOR: PROTEUS 8.0 SOFTWARE: KEIL 4.0 CIRCUIT DIAGRAM:   CIRCUIT DESCRIPTION: Switches from one to seven are connected in pull-up configuration to p1.0 to p1.6 respectively. A buzzer is connected to p2.0. WORKING: In this project, I have created the prototype of the piano using seven switches and a buzzer. Seven switches are used as a seven keys(sa, re, ga, ma, pa, dha, ni, sa) of piano. A buzzer is used to generate the sound given by the controller(AT89C51RD2). Whenever a switch related to a particular key is pressed, the frequency of that particular key is applied to the buzzer by the controller(AT89C51RD2). PROGRAM: #include<reg51.h> sbit sw1 = P1^0;   // SA sbit sw2 = P1^1;  // RE sbit sw3 = P1^2; // GA sbit sw4 = P1^3; // MA sbit sw5 = P1^4; // PA sbit sw6 = P1^5; // DHA sbit sw7 = P1^6; // NI sbit pulse = P2^0; //buzzer void tune(unsigned int th,unsigned int tl); int main() {   while(1) { if(sw1==0)   { pulse = ~P2^0; tune(0xf8,0x77); // frequency of sa } if(sw2==0) {

DC motor interfacing using AT89C51RD2

Image
SIMULATOR: PROTEUS 8.0 SOFTWARE: KEIL 4.0 CIRCUIT DIAGRAM: PIN DESCRIPTION of L293D: VSS and VS: +5v to +9v GND: GND EN1: Enable pin of motor 1 EN2: Enable pin of motor 2 IN1 and IN2: Input pin of motor 1 IN3 and IN4: Input pin of motor 2 OUT1 and OUT2: Output pin of motor 1 OUT3 and OUT4: Output pin of motor 2 CIRCUIT DESCRIPTION: EN1 and EN2 are the enable pins of dc motor 1 and dc motor 2 respectively. Both the enable pins must be connected to VCC to run the dc motors. IN1and IN2 pins are connected to p2.0 and p2.1 respectively.IN3 and IN4 pins are connected to p2.3 and p2.4 respectively.OUT1 and OUT2 pins are connected to dc motor1.OUT3 and OUT4 pins are connected to dc motor2. Switch 1 and Switch 2 are connected in pull-up arrangement to port1.0 and port 1.5 respectively. WORKING: In this project, I have interfaced two dc motors using the AT89c51RD2 controller. Motor driver L293D is used to drive both the dc motors. Whenever switch1 is pressed, dc mot

LCD interfacing using AVR(ATMEGA 32)

Image
SIMULATOR: PROTEUS 8.0 SOFTWARE: KEIL 4.0 CIRCUIT DIAGRAM: PIN DESCRIPTION OF LCD: PROGRAM: #include<avr/io.h>   // header file for AVR #include<util/delay.h> // header file for delay function void lcd_init(void); void lcd_command(char c); void lcd_data(char d); void str(char a[]); int main(void)    // main program   { DDRB=0XFF;  //  Select PORT B as an output port DDRD=0XFF; // Select PORT D as an output port lcd_init();      // initialize the lcd while(1)             // continuous loop   { str("WELCOME TO THE");  lcd_command(0xc0);                  // move cursor to the next line str("EMBEDDED SYSTEM"); lcd_command(0x01);           // clear display } } void lcd_init(void)  // lcd initialization function { lcd_command(0x38); //8bit,2 line,5*7 matrix lcd_command(0x0c); //cursor off,display on lcd_command(0x80);//force cursor to the beginning of the first line lcd_command(0x01);// clear display lcd_co

INT0 and INT1 interrupt in 8051

Image
SIMULATOR: PROTEUS 8.0 SOFTWARE: KEIL 4.0 CIRCUIT DIAGRAM: WORKING: Any event which occurred internally or externally in a microcontroller that stops the current execution of the program is called an interrupt. Whenever an interrupt occurs, the microcontroller stops the current execution of the program and executes the program written for the interrupt which is also called the ISR (interrupt service routine). Here in this project, I have used int0 and int1 interrupt. To enable the interrupt operation respective bit in the IE register must be equal to 1. I  have connected sw1 to INT0 pin of 8051 and sw2 to INT1 pin of 8051. If  sw1 is pressed, it provides an active low signal to INT0 pin of 8051 which activates the INT0 interrupt. If sw2 is pressed, it provides an active low signal to INT1 pin of 8051 which activates the INT1 interrupt. Here in the ISR of INT0, I have written the logic to turn ON the LEDs and in the ISR of INT1, I have written the logic to blink the LEDs. Therefor